


12 years ago
Ok, so I finally got to do some work on the flat again. Most of it was simply decorating and the like but I did want to include a couple of specific projects, one of which was the construction of an in-built book case to the living room.
This would have two purposes, the first of which is obvious (to hold books) and the second, to bring the corner suite away from the window wall and prevent it trapping the curtains. Don't worry, all will be clarified as we go along. But first let's take a look at the site for the new book case...

What you see here is the corner into which the suite parks. To the right there is a patio door and if you look closely enough you can see the curtain rail above it. Adding one and one together, you can see how the curtains would look odd in the way they fall. So the objective for this project is to build out that corner, adding more depth to the window reveal and at the same time including some form of bookcase so I can finally finish some more unpacking.
So first off, we add battening to the walls we will be working off. The uprights to carry the plasterboard skin and the horizontal to carry the actual bookcase when it is ready.

Having done that, the next step is to continue constructing what will be the front of the assembly...

This part of the assembly is the most important as it is considered 'load bearing'. That top horizontal should be level and level with the back battening we added earlier as it is on these that we will later sit our bookcase and a fully loaded bookcase can be extremely heavy. Hence the vertical supports being added below our makeshift shelf (for want of a better term).
And Having done all that, we disappear to make our bookcase.
The easiest way to do this is to simply butt our pieces of wood together and screw them in place (as was done here). Or another way is to construct the main frame (jointed as above) and then drill a series of holes for shelf pegs if you prefer the shelves to be adjustable.

In the example I have illustrated, I have used simple white faced MFC for the construction which is a melamine coated chipboard. Care must be taken on this stuff when driving screws as they can easily pop through the surface if not driven with a certain degree of accuracy. It is strongly advised to drill pilot holes prior to driving the screws in for this reason.
And so, having built the shelving, all we need now is a back for it. For this I opted for a white faced hardboard which was simply nailed onto the back of the shelving unit with ring pins. But before doing that, care has to be taken that you are actually building it square.
It is all too easy to assume that when knocking up a box of equal dimensions it should be square, but that is often far from the case as the illustration below shows. So before adding your back panel to the bookcase, check the diagonals for 'square' and adjust it if necessary simply by pushing it into the right shape. Then you can add the back panel.

And with the back panel now fitted, all that remains is to lift it into position on our previously made shelf and centre it as required. There's no need to fix anything at this stage as we need to find the finished surface measurement to properly align it but when centring, don't forget to allow for the thickness of the plasterboard (9mm) on the side gable.

And with our bookcase finally in position, all we need to do next is add more timbers to allow for the fixing of our facia panels as below.

It is important here that the bookcase remains moveable as we are still not ready to assume a fixed position (front to back) for it. But having all our timbers in place now, we are ready to face the whole assembly with plasterboard using all of the timber battening to screw or nail the facing material onto.

And having faced off the whole assembly, now is the time to adjust the book case into it's final position. Here we wanted it to sit just a couple of millimetres proud of the plasterboard to allow for a flush plastered finish. This was done by simply tapping it into position and pinning through it into the surrounding battens behind.
Note too that scrim tapes were added over the plasterboard joints to prevent them cracking and a metal skim bead was added to the external corner. This will give it extra strength against any future accidental knocks as well as a better finish to the corner when plastering which was the next step.
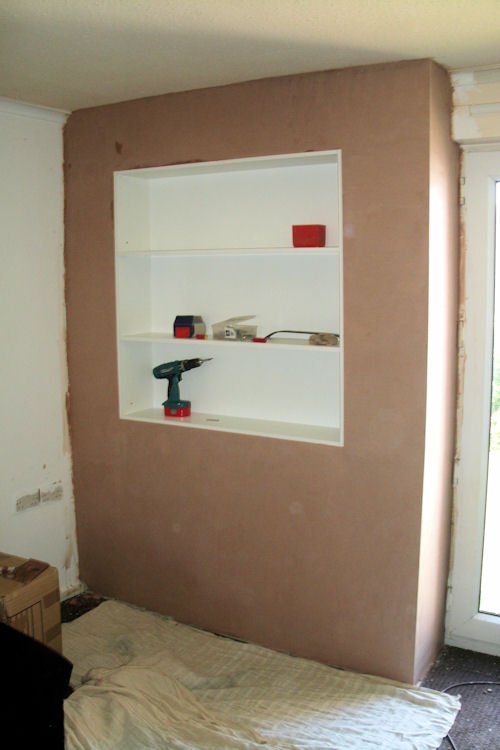
Now our bookcase looks more like an integral part of a solid wall. Just as was intended. And all that remained to be done was to decorate it along with the rest of the room. Here I opted for a plain matt paint finish and because it was going onto bare plaster, I used a 'contract' emulsion which is specifically developed for such purposes.

And with the room now fully painted, all that remains is the addition of skirtings to the floor and an architrave around the actual book case.

And here it all is as fully intended at the outset....


1 Comment:
-
25 July 2011 at 02:39
oooh very nice! I want one and love the extra massive couch hope I get to visit one day!
Subscribe to:
Post Comments (Atom)

Some of my more popular posts
-
 “So there I was standing in the shower, practically naked, kissing my best friend and secret crush and I couldn’t help but think it was th...
 -
 I've just read yet another newspaper article about the threat of global warming. And last night on TV. Al Gore was warning that it...
 -
 He will dutifully return to his cell. The door will shut, his small cage will darken. He will lie down and try to rest, desperately tryi...
 -
 She slid up close next to David, careful not to tear her silk skirt on the old park bench. It was a cold night and she knew that what she ...
 -
 I’ve been quite busy recently... I think I mentioned my ever increasing to do lists, and that they have taken up a lot of time. And as a ...
 -
 The day was ordinarily dull and grey, but into the grim world there came a new shining light... Yes it was my bald head. It...
 -
.jpg) Inspired by a sign I have just read at the local hospital A and E department, I had to rush home (after my treatment of course) and write ...
Inspired by a sign I have just read at the local hospital A and E department, I had to rush home (after my treatment of course) and write ... -
 Back in the day when I was a fully fledged, cards in wage slave, I was actually sacked from my first job. And if the mentor in my new job ...
 -
 I went to a funfair quite recently, and noticed that at most of the stalls there, it was quite difficult to win anything. The ‘games of sk...
 -
It has quite often come to my attention that "Why?” is the only question that bothers people enough to have had an entir...


Post a Comment
Thanks for reading this blog entry, feel free to leave your comments